

February 20th, 2016
A seven year old’s palate, at least my seven-years old’s palate, is completely unpredictable. There have been many times when I’d cooked up something along the kid friendly lines of muffins, pancakes, pizza, or chocolatey anything, convinced that Paloma will eat some, only to see a frown and hear around ten melodramatic versions of ‘I don’t like it.’ Just as often, she’ll surprise me with falling for flavors that I never thought she’d like. Last summer, during our long stay in Russia, Paloma discovered parsley and became obsessed with snacking on whole parsley leaves, frankly leaving me speechless. Lately, Florida farmer’s market Romaine lettuce sprinkled with balsamic vinegar and olive oil, or pizza topped with a mound of rainbow chard have been among those unexpected favorites.

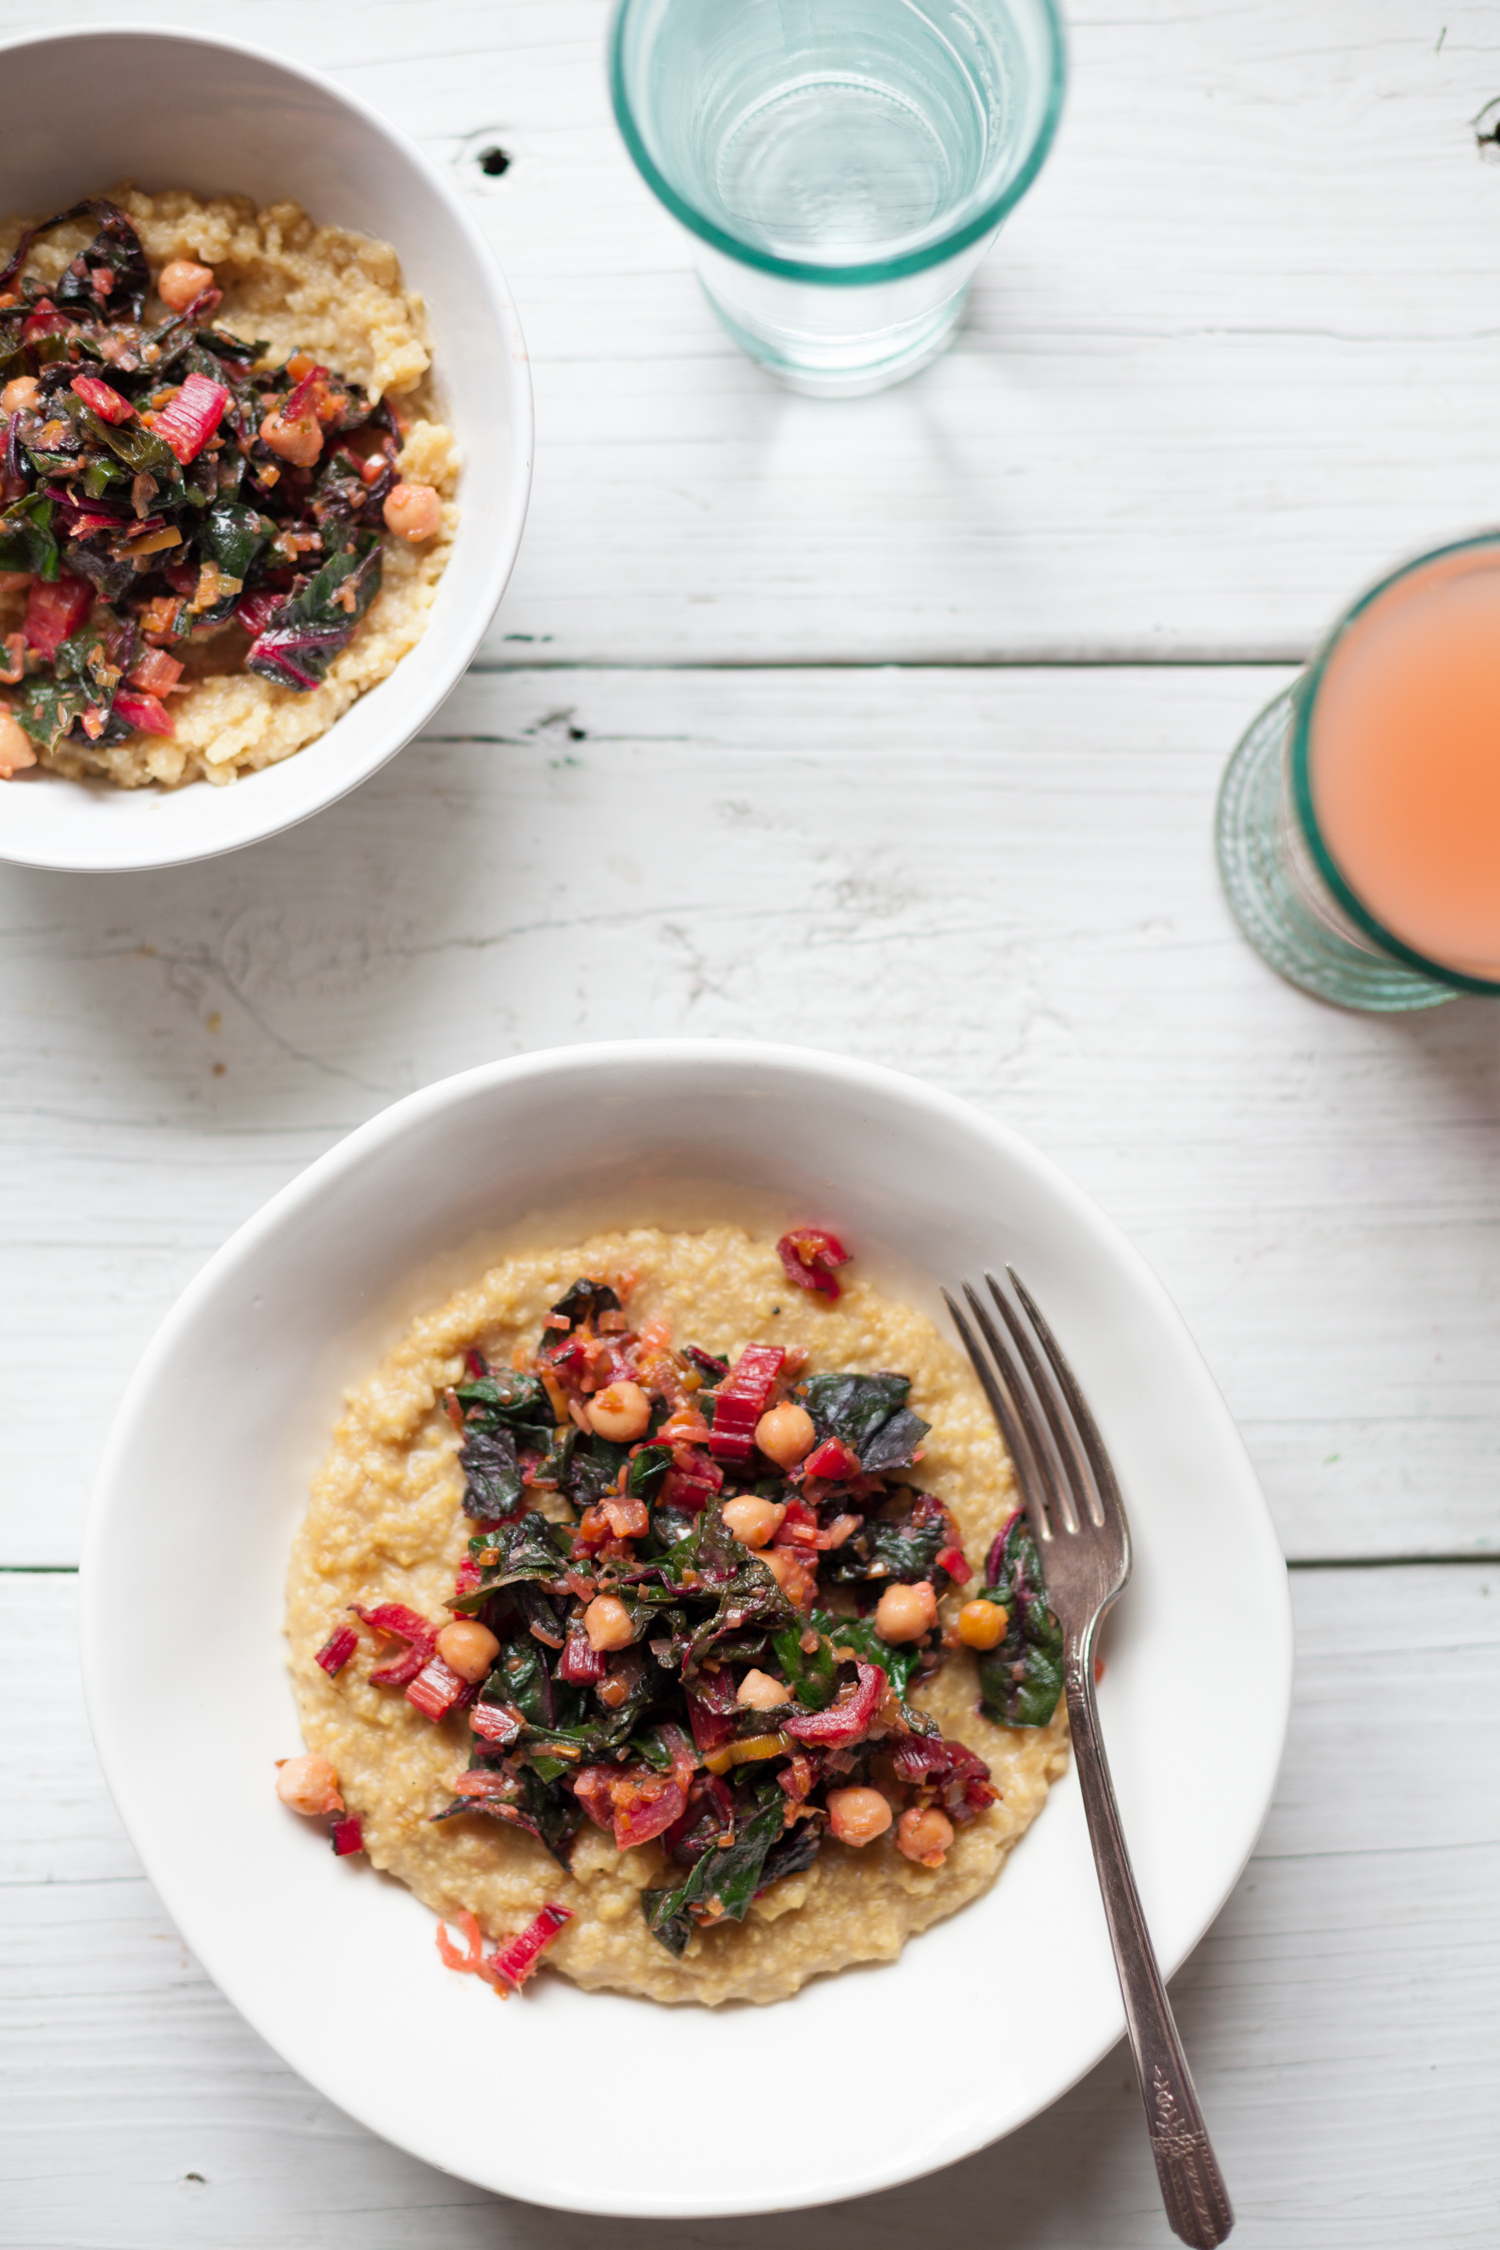
I have a variation of this polenta recipe I developed for the new cookbook, with a different grain. The dish is full of amazing flavors, but ones I thought to be too sophisticated for a child’s palate. I was wrong once again, when Paloma not only ate the polenta for dinner the night I made it, but became completely fixated on eating it every day, asking for it each time she came home from school.

Since then, ‘polenta’ has become quite a hot item in our house. I’ve been experimenting with different grains and toppings, and this version came out on top. Creamed, lemony millet is topped with nourishing green vegetables and beans. The vibrant colors of the dish speak for its flavor – also zingy, sunny and comforting. I use chard stems along with the leaves in this recipe, which I cannot stand to see thrown away. They just need a little extra cooking time to be delicious.
Enjoy the weekend!

Creamy Millet Polenta with Rainbow Chard and Chickpeas
serves 4-6
1/2 cup dried chickpeas – soaked overnight
1 medium onion – halved
3-4 garlic cloves – crushed with a knife
6 cups water
sea salt – to taste
2 tablespoons neutral coconut oil or ghee – divided
1 cup millet – soaked overnight
juice of 2 lemons – divided
2 tablespoons olive oil – divided
1 tablespoon tamari
2 tablespoons sweet miso paste
1 tablespoon mustard
1 garlic clove – minced
pinch of cayenne pepper
1 teaspoon cumin
1 large leek, white and pale green parts only – sliced
1 bunch rainbow chard – leaves separated from stems, stems chopped, leaves torn into bite-size pieces
1. Drain and rinse chickpeas and place them into a medium soup pot together with onion, garlic and water. Bring to a boil over high heat. Lower the heat to a simmer and let cook, partially covered, for about 30 minutes or until completely soft. Add salt at the last 10 minutes. Drain chickpeas, reserving the broth. Discard onion and set chickpeas aside. Pour the broth back into the pot and keep it hot.
2. Drain and rinse millet. Add to a food processor and grind until partially broken down, but not completely smooth.
3. Warm 1 tablespoon coconut oil in a medium saucepan over medium heat, add millet, stir to coat. Add 1/2 lemon juice, stir in for about 30 seconds until absorbed. Add 3 cups of hot chickpea broth and salt. Bring to a boil while stirring. Lower the heat and simmer for 20 minutes, until polenta is creamy. Stir frequently to prevent clumping. Add 1 tablespoon olive oil or ghee and tamari. Cover and keep warm.
4. Meanwhile, mix together miso paste, mustard, garlic, the remaining 1 tablespoon olive oil, the rest of the lemon juice and cayenne pepper. Set aside.
5. In a large pan, warm the remaining 1 tablespoon coconut oil. Add cumin and stir around until fragrant. Add leek, saute for 5 minutes, then add chard stems, salt and pepper and saute for another 3-4 minutes, until soft. Add chickpeas, stir to coat and warm through. Add chard leaves, 1/4 cup hot chickpea broth and the miso dressing. Stir until chard leaves are wilted and everything is coated evenly.
6. Distribute the polenta between bowls, top with the chickpea-veggie mixture and serve hot.
Tags: chard, chickpeas, gluten free, leeks, millet, miso, polenta, vegan
 Tweet
Tweet
February 6th, 2016

Recently, I’ve been working on developing very light, very mildly sweetened, mousse-like dessert recipes for the new cookbook, and this White Chocolate Blood Orange Mousse Tart is an example of my experiments. I have a weakness for anything soufflé or custard-like, and I’ve grown quite sensitive to the overly sweet treats that monopolize our world, so this tart turned out to be the dessert of my dreams.

It’s blood orange season and I can never miss the opportunity to take advantage of the fruit’s photogenic nature. In addition, I just got my hands on a fresh batch of the most fragrant raw cacao butter. Being that orange and cacao is one of the most heavenly pairings known to man, I had to combine the two.

Irish moss will always be my number one thickener of choice, but because it’s so difficult to find for so many readers, I’ve decided to familiarize myself with the more widely available option – agar-agar. Agar is another sea vegetable based thickener, available in most health food stores, and I use it in this recipe to achieve a mousse-like consistency.

The texture of the mousse is very light and airy, accompanied by the intoxicating aroma of cocoa and subtle notes of citrus. Blood orange juice contributes the most gentle pale pink color, one that makes me stop and stare for a little too long. You’ll love the crust as well – it’s tender, buttery (with no addition of butter), and thin – all to go along with the delicate nature of the filling. Enjoy!

White Chocolate Blood Orange Mousse Tart
makes 1 9-inch tart
Notes:
1) I highly recommend using homemade almond milk here, as it is one of the few and main ingredients. Homemade almond milk is much creamier than its store-bought counterparts, and the creaminess is important to the texture of the mousse.
2) You can choose to omit the crust and serve the filling on its own, distributed between ramekins, as shown in the photo above.
for the crust
1 tablespoon ground chia seeds
3-4 tablespoons ice cold water, divided
1/2 cup coconut oil – cold and solid, plus more for oiling the springform – at room temperature
3/4 cup oat flour (I use ground rolled oats)
1/2 cup almond flour
1/4 cup tapioca flour
2 tablespoons coconut sugar
pinch sea salt
for the filling
3 cups homemade almond milk
1/3 cup maple syrup
pinch sea salt
3 tablespoons agar-agar flakes (I like these)
2 1/2 oz raw cocoa butter – shredded
zest of 2 blood oranges
1 cup blood orange juice
1/2 tablespoon vanilla extract – optional
to make the crust
1. Combine chia and 1 tablespoon cold water into a paste in a small bowl, keep refrigerated. Prepare a 9-inch springform by covering the bottom with parchment paper and generously oiling the parchment and the sides of the form with coconut oil.
2. Combine all the flours, coconut sugar and salt in a food processor, pulse to mix. Add refrigerated chia paste, pulse to incorporate. Cut coconut oil into cubes, add to the flours and keep pulsing until the mixture resembles sand.
3. Add 2 tablespoons cold water and process until the mixture comes together when pressed with fingers. Add 1 more tablespoon of water if necessary. Take care to not overproces.
4. Press the crust mixture against the bottom and sides of the form evenly, leaving about 1/2 inch of the sides uncovered at the top. The crust will be very thin to be to compliment the airy and delicate blood orange mousse. Refrigerate the crust for 30 minutes.
5. Meanwhile, preheat oven to 350 F. After 30 minutes in the fridge, cover the crust with parchment paper, weight it down with baking beans and blind bake crust for 20 minutes. Remove beans and paper and bake for another 15 minutes, until golden. Let cool.
to make the filling
1. Combine almond milk, maple syrup, salt and agar-agar in a medium saucepan and bring to a boil, whisking frequently. Lower heat to a slow simmer and cook partially covered for 5 minutes, whisking periodically, until agar flakes dissolve.
2. Remove from heat and add shredded cacao butter. Cover and let melt for about 5 minutes.
3. Add milk and cacao mixture to a blender, together with blood orange juice and vanilla. Blend to combine, for about 20 seconds. Taste and add more maple syrup, if needed. Add orange zest and pulse a few times.
4. Pour the mixture into a large heat proof bowl and let cool for about 30 minutes, whisking occasionally. When cool, pour mixture into the baked crust and refrigerate until completely set.
5. Carefully remove the spring form. Decorate tart with orange slices and/or zest. Slice one piece of the tart at a a time and serve immediately.
Tags: agar-agar, almond milk, blood orange, dessert, gluten free, orange, tart, vegan
Tweet
January 18th, 2016

Today’s soup was inspired by the Simmered Winter Squash recipe from Heidi Swanson’s beautiful new cookbook, Near and Far. I’m used to roasting or steaming squash, so Heidi’s take on the Japanese technique of simmering it in a flavorful mirin and tamari-based broth had me intrigued. Simmering turned out to be a simple and quick way of preparing very flavorful squash, so I decided to build on Heidi’s recipe, originally a side dish, and make it into a meal.


I made a soup, adding more water to make the simmering liquid into a broth, with the addition of kombu and shiitake for a more pronounced broth flavor. As a side note, I’ve been adding kombu to many of my broths lately, for its amazing health benefits and subtle sea flavor.

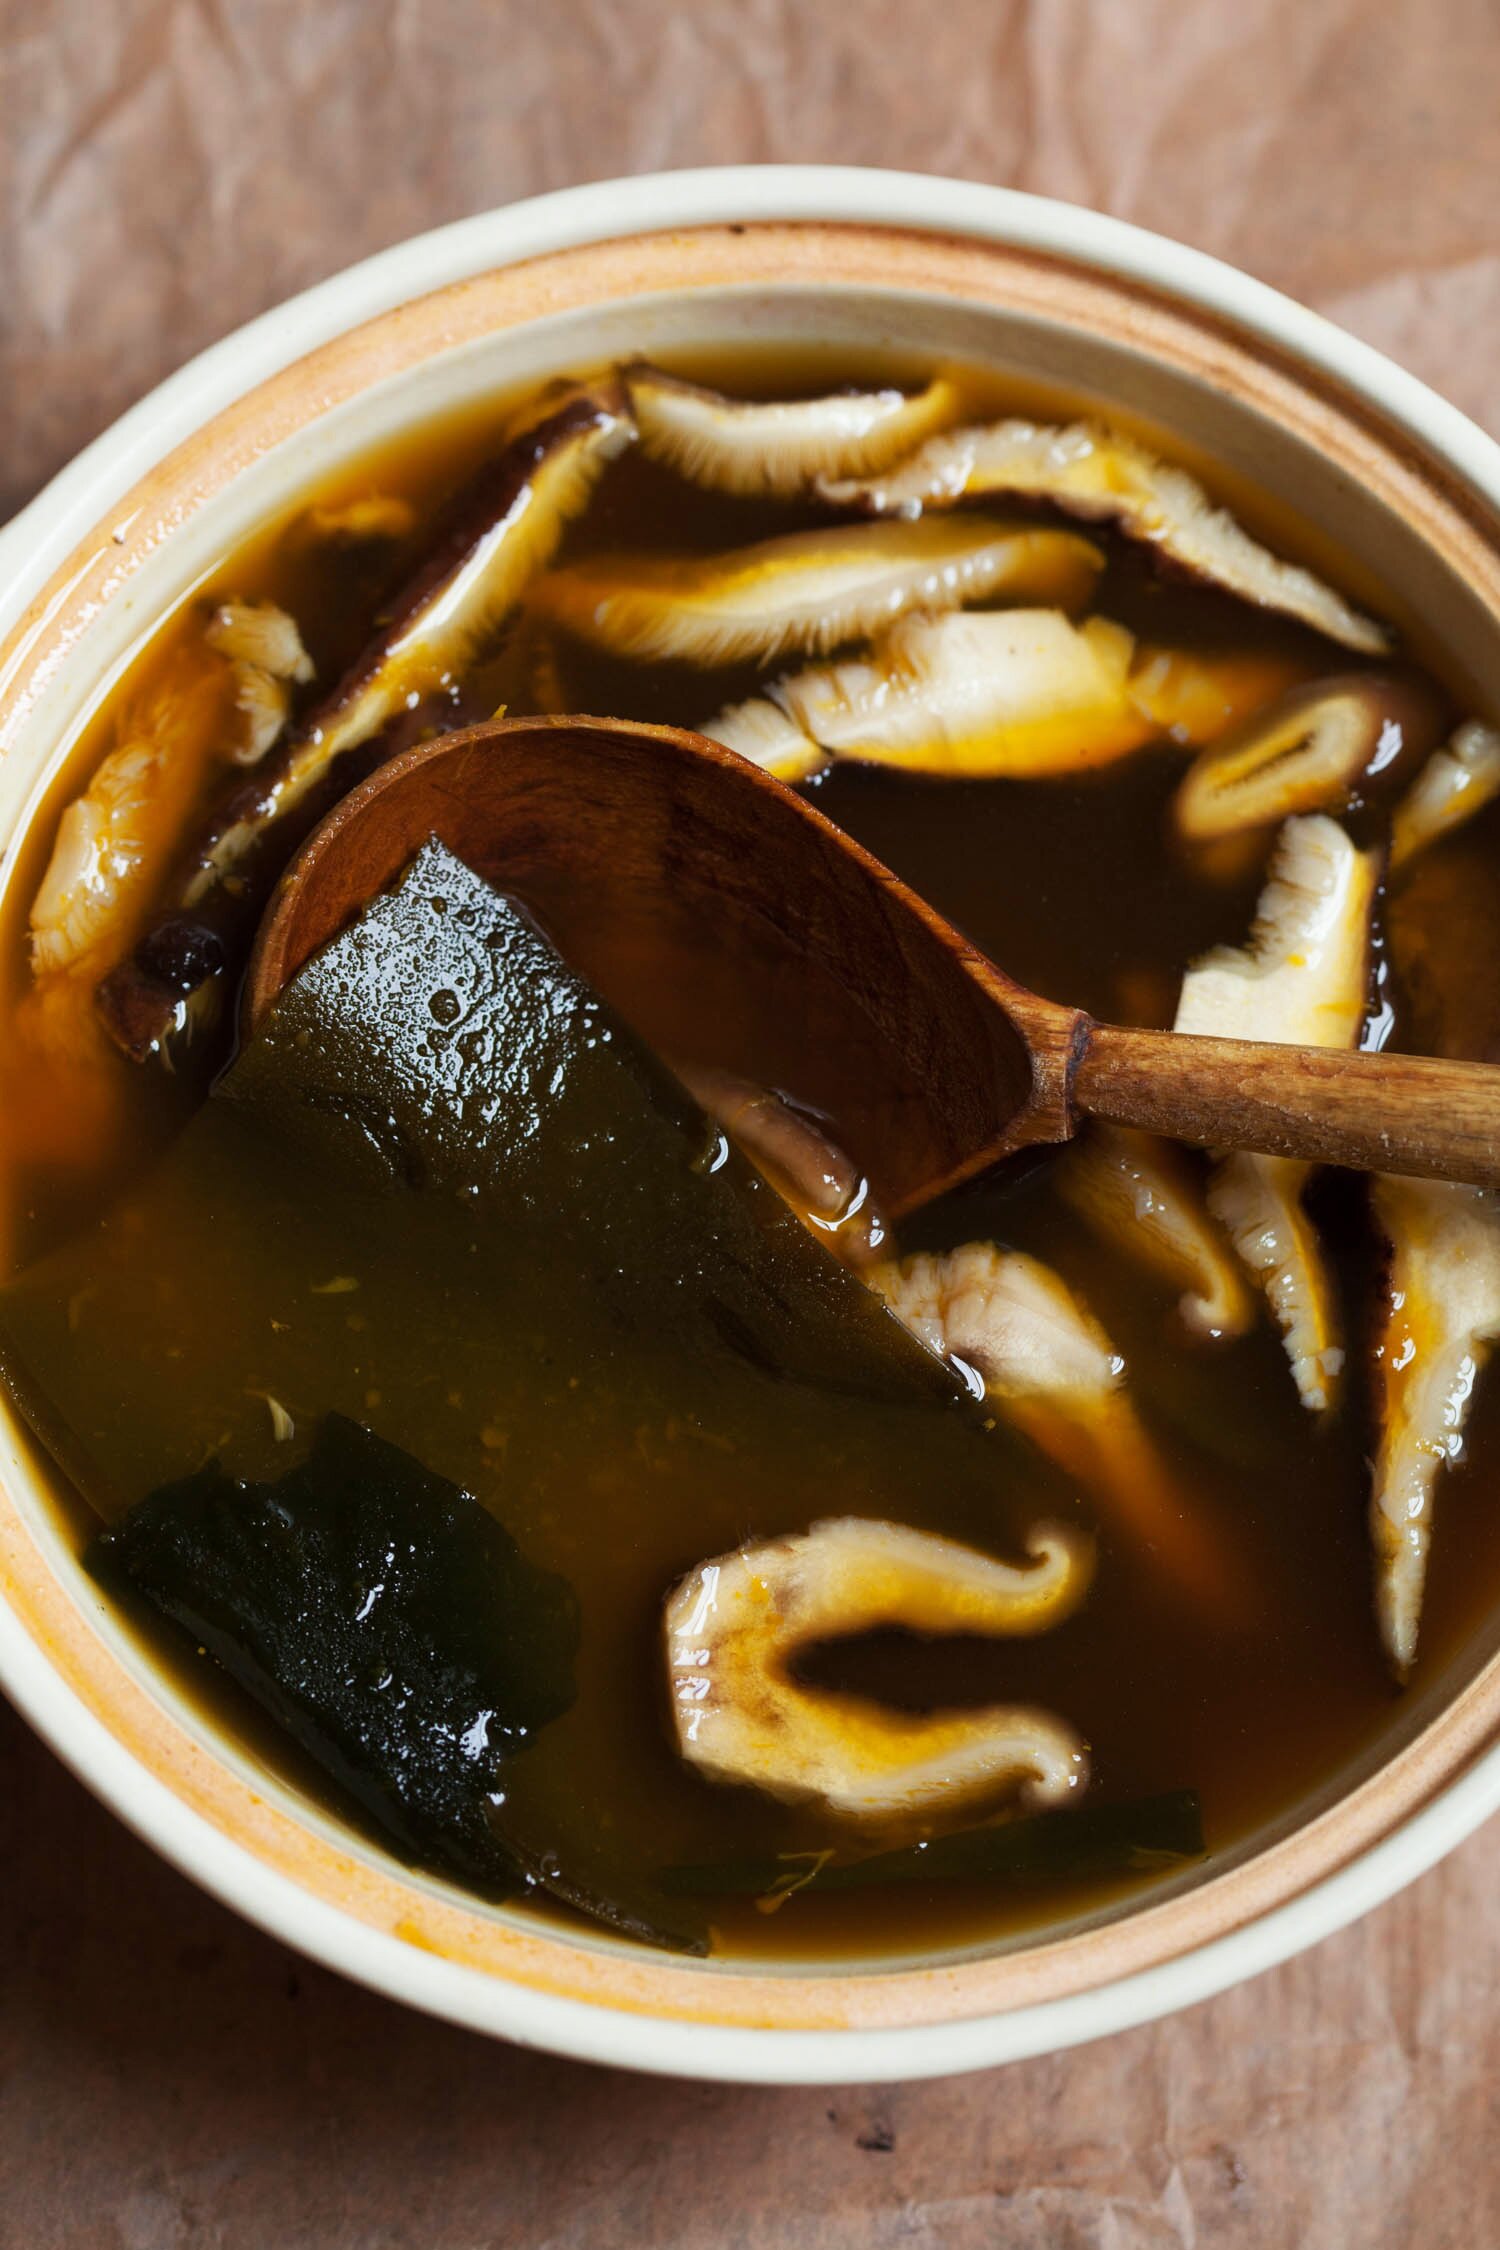
I served the squash covered with its broth, alongside soba noodles, tofu, toasted black sesame seed paste and herbs, making for a nourishing winter bowl. Whether you are getting home from the cold in need of a hot meal, or feeling under the weather, this soup will be your friend this winter.

And if you haven’t gotten a chance to take a look at the Near and Far cookbook, do not wait much longer. It’s a thoughtful piece of work, full of recipes that will inspire you to get up and cook, explore new ways of seeing familiar ingredients, and feel as if you are a world traveler with every flip of the page.

Plating/Styling Inspiration Credit: Camille Becerra
Simmered Squash Soba Bowl
(adapted from Near and Far)
serves 4 -6
1 package firm non-GMO tofu
5 cups water
3 1/2 tablespoons tamari
4 1/2 tablespoons mirin
1 tablespoon coconut sugar
4-inch piece kombu (I like this one)
1 small winter squash – kabocha, kuri or butternut, seeded, sliced into wedges or chunks, peeled for butternut
about 1/2 lb fresh shiitake – stems removed, sliced
12 oz soba noodles
2 tablespoons black sesame seeds, toasted and crushed with mortar and pestle
few drops of toasted sesame oil, optional
handful wakame seaweed, optional
1 watermelon radish – thinly sliced, optional for garnish
handful fresh basil leaves or finely chopped green onions for garnish
1. Drain tofu and place it on a plate. Cover with another plate and place a weight on top, like jar filled with water. Let drain while you’re working on the rest.
2. Combine water, tamari, mirin and sugar in a medium soup pot, stir to combine. Add kombu and squash and bring to a boil. Lower the heat to a simmer and cook for about 15 minutes, partially covered, until the squash is tender. Add shiitake at the last 5 minutes.
3. Add a few drops of sesame oil to the crushed black sesame seeds, if using, set aside. Prepare a separate pot of water for cooking soba noodles
4. When squash is almost done, cook soba noodles according to the packaging instruction.
5. Taste the broth, add more tamari if more salt is needed and remove from heat. Remove and discard kombu, add wakame if using, stir it in and let sit for a couple of minutes.
6. Drain and slice tofu into large chunks. Distribute tofu between bowls, followed by soba noodles and squash. Pour the broth with shiitake and wakame into the bowls. Garnish with slices of radish, black sesame paste and fresh basil. Enjoy right away.
Tags: black sesame, gluten free, shiitake, simmered squash, soba, soup, squash, tofu, vegan
Tweet

