

March 16th, 2014
One of the best things about the warm winter here in St. Petersburg, Florida is our Saturday morning market. Situated right on the waterfront in the heart of downtown, the market buzzes with crowds of people, who come here to enjoy the live music, plenty of sunshine, beautiful local produce, and the array of ethnic food stands. Produce from the local organic Warden farm has become so popular in the past few years, that we have to get up earlier on Saturdays if we want to get there before all the red baby kale, salad turnips, huge bushes of fragrant herbs, and lots of other amazing things are sold out.
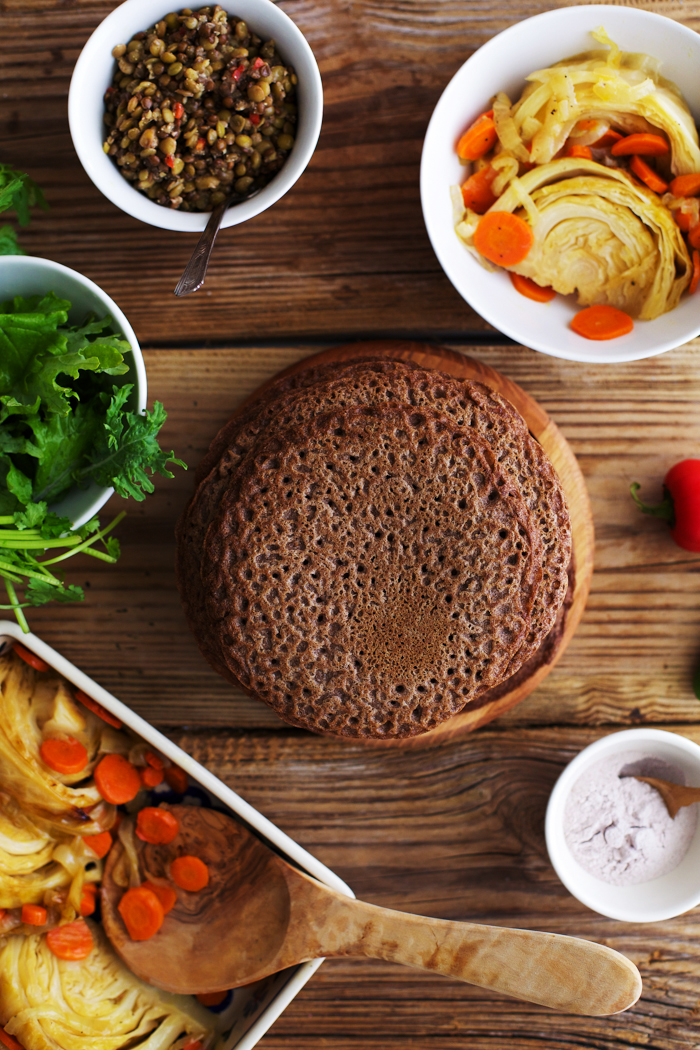
Somehow, it’s become a tradition among our circle of friends to meet by the Ethiopian kiosk for some spicy vegan fare every Saturday, after packing our bags full of local produce. The food there is very simple yet flavorful and fresh. I, along with most of our friends, prefer their lentils and cabbage with the spongy sour bread, injera, which is traditionally used in place of utensils and pairs perfectly with spicy food.
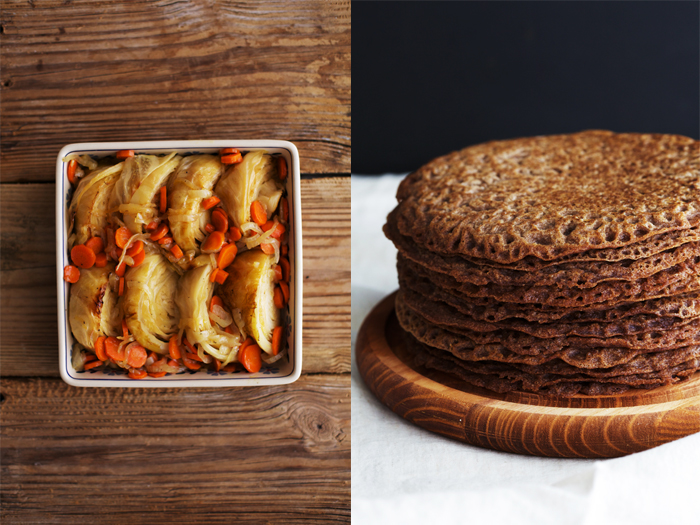
Of course, being as cooking crazed as I am, I presented myself with the challenge of recreating the injera bread recipe at home, which turned out to be quite an easy and interesting process. I found out that traditional Ethiopian injera is made of teff flour, native to Ethiopia, which I never used before. After experimenting with teff, I can justify that it tastes just like rye, only it’s gluten free. It has a slightly grainier texture than rye and is very nutritious. I happen to absolutely love the taste of rye, so teff won my heart right away. After making my own injera from 100% teff flour, I realized that our Ethiopian vendors from the market add wheat to their injera, which would make the process a bit easier. It’s like that time I tried to make sourdough bread both completely gluten free and with gluten – the glutenous recipe went much smoother, and there is no need to add yeast in this case. But I decided to stick to the gluten-free injera, which is not complicated or labour intensive to make at all, but takes five days of waiting for the teff mixture to ferment. A word of warning – the starter has an unpleasant smell during the process, and not in the fruity, cozy way that a wheat sourdough starter does. Once bread is cooked, the smell disappears and the taste is wonderfully earthy.
I looked to an Ethiopian recipe to recreate the Mustard Lentils, while the Braised Cabbage recipe is my own idea of tasty cabbage inspired by our Ethiopian market stand.

Ethiopian Injera
(adapted from here)
to make the starter
1/2 cup teff flour
1/8 teaspoon dry active yeast
3/4 cup water at 70 F (20 C)
1. Whisk all the ingredients in a bowl or a glass jar, cover with something breathable like cheesecloth and leave to rest at room temperature for 2 days. You should see some rising along the way.
2. Stir the starter – it will smell very grassy, almost in a spoiled kind of way (it might even make you think that it went bad – it likely did not). Resist the urge to throw it away, the smell indicates fermentation and that’s what we’re looking for. You also should see bubbles on the surface. Feed the starter with 1/3 cup teff flour and 1/2 cup water, cover and leave to ferment for another 2 days.
3. The starter may separate into two layers at this point – that’s fine. Stir it and feed with another 1/3 cup teff flour and 1/2 cup water. Cover and let ferment for at least another 4 hours or overnight. After that, your starter is ready.
to make the injera
1/4 cup starter from above
1 3/4 cups water at room temperature
1 3/4 cups teff flour
generous pinch of sea salt
1. In a large bowl, dissolve the starter in water. Add in the flour and whisk into a smooth pancake batter. Cover and let it ferment for 5-6 hours. Reserve 1/4 cup of starter for the next batch if desired.
2. Add in salt, whisk again to dissolve and begin cooking the injera. Optionally, you can add 1/2 teaspoon of baking soda to get more bubbles.
3. Heat a non-stick pan or a skillet with a tight-fitting lid over medium heat. Lightly grease it with vegetable oil using a paper towel.
4. Add about 1/3 to 1/2 cup of batter to the pan, depending on its size, tilting it and swirling the batter to cover the surface evenly. Cook for about 1 minute until bubbles appear on the surface.
5. Cover with a lid and steam the injera for about 3 minutes, until the top is set and the bread easily pulls off the pan. No need to flip it over. Remove it and continue with the rest of the batter. It will take a few tries to get the temperature and the cooking time just right.
6. Keep the cooked injera covered and warm. Serve with any spicy dish like this lentil salad.
Braised Cabbage
1 medium cabbage head – cut into 8 wedges
2 medium carrots – peeled and diced
1 large onion – peeled and sliced
3 tablespoons olive oil
1/4 cup vegetable broth or water
sea salt and freshly ground black pepper – to taste
pinch red pepper flakes – optional
1 teaspoon turmeric – optional
1. Preheat oven to 325 F (160 C). Snuggly arrange the cabbage wedges in a lightly oiled baking dish. Drizzle olive oil and broth/water over it, followed by salt, pepper and turmeric, if using.
2. Cover with foil and braise for 1 hour. Remove the dish from the oven and carefully flip the cabbage wedges. Braise for another hour. Increase oven temperature to 400 F (200 C).
3. Remove the foil and place the dish back into the oven for another 15-20 minutes, until the cabbage is golden brown.
Mustard Lentils
1 cup lentils (I used puy, but green or black would work just as well)
1 teaspoon black mustard seeds
1/2 teaspoon black peppercorns
1 teaspoon sea salt
pinch of cayenne pepper
juice of 2 small or 1 large lemon
3 tablespoons olive oil
1 chile or jalapeno – seeded and minced
1. Cook the lentils in plenty of salted water until soft, 15 minutes or so, depending on the type of lentils.
2. Grind the mustard seeds and peppercorns in a mortar and pestle. Add in the salt and cayenne and pour 1 tablespoon of boiling water over the spices. Add lemon juice and olive oil, stir to combine.
3. Add the chile/jalapeno into the lentils and pour the dressing over them. Toss well to combine, adjust salt.
Tags: bread, gluten free, lentils
 Tweet
Tweet
January 21st, 2013
When I received an email from Elenore of Eearthsprout and Sarah of My New Roots asking to participate in the Fabulous Fermentation Week that they are hosting right now, I was on a true kick and there was a little fermentation factory in our kitchen. Looking around, I saw jars of kombucha and fruit kvass, kefir, oat yogurt, sauerkraut, and a couple of different bread starters, and admittedly felt a little crazy. To be fair, many of those experiments were for the book, which will have a few delicious recipes involving fermentation. Wild yeasts were floating happily in the air, so it was perfect timing to say the least.
I’d love to celebrate Elenore and Sarah’s wonderful effort to spread the word about the great benefits of fermentation with a loaf of sprouted sourdough bread. Head over here to read all about the health in fermentation and see the list of bloggers’ links, which will be updated throughout the week.
After our summer trip to San Francisco and multiple visits to Tartine bakery, I became curious about sourdough bread, particularly about Chad Robertson’s sourdough method. Those of you who have ever tried Tartine bread know exactly what I’m talking about – there is nothing quite like it.
My ultimate goal was to find a way to make a gluten-free sourdough that tastes good. I’ve heard it’s possible, but have yet to bake one of my own. After experimenting with gluten free options for some time, I realized that I first need to learn to make glutenous sourdough the correct way and only then can I start experimenting. I began to study the Tartine Bread book, which cleared up a whole lot of issues.
It was challenging for me to follow the Tartine technique, as I only worked with sprouted whole grain flours, spelt in particular. I ordered beautiful sprouted spelt and wheat flours from To Your Health Sprouted Flour Co. They make it to order, so it is incredibly fresh flour.
Sprouted grains are believed to be digested by our bodies in the same way that vegetables are, because the process of sprouting breaks down the starches into simple sugars.
In order to completely understand how to make bread the Tartine way, you would need many pages of detailed instructions, and better yet, the book. But even the most clear directions might not be enough in the beginning – one needs to develop a baker’s intuition, which comes with the experience.
Right now I am working on a gluten-free sourdough bread and hope to share the results soon.
Bellow are some things that I learned from trial and error with different flours, applying Chad Robertson’s technique:
1. You need to be patient. It may take time to get your starter going, but if you feed it every day, it will always respond to your efforts, even if it seems that it never will in the beginning.
2. You have to discard about 80% of the starter every day and replace it with an equal amount of flour/water mixture. You need a reliable kitchen scale to weigh the flour and water. Bakers always use metric conversions as they’re more exact and convenient.
3. Go on with your bread only if the starter is undoubtedly strong and reliable – meaning that it’s falling and rising predictably for several days in a row. If in doubt, wait and feed your starter one more time. When you see a strong starter, you’ll know it.
4. Only a very small amount, about 1 tablespoon of starter, should be used for bread.
5. The starter does not go directly into the bread, you have to make a levain first.
6. The levain must pass a floating test.
7. The time of fermentation needed for ripening of the levain, bulk fermentation, bench rest, and final rise differs hugely from kitchen to kitchen. It depends on room and water temperature, the type of flour used, the amount of wild yeast in the air, how long and often you bake, your disposition that day, and who knows what else. You can begin with the general guidelines, but be flexible and patient.
8. Spelt sourdough will not rise as much as wheat will. Spelt flour makes the dough kind of runny and doesn’t hold shape well. Taste-wise, though, it is delicious.
9. Sprouted flours work very well in sourdough. You can replace regular flour entirely or partially with sprouted flour. 100% sprouted sourdough will make a darker, denser bread.
10. The degree of sourness of your bread depends on the time of fermentation. The longer you let it ferment, the more sour your bread will be.
11. You can delay bulk fermentation and final rise by placing your dough in the refrigerator. By doing that, you can manipulate the process to fit your schedule.
12. You absolutely need an iron cast dutch oven or a combo cooker to bake your sourdough bread if using a home oven. It allows for just the right amount of steam needed in the first 20-30 minutes in the oven.
Sourdough Starter
1. In a medium sized glass jar, mix 70g of rye or whole spelt, or wheat flour (I use sprouted flours) with 70g of purified water. Cover the jar with cheese cloth, a nut bag or anything breathable. Wait for 24 hours and see if any bubbles appear. If not, leave it for another day or two, checking periodically. A crust may form on the surface. Remove it with a wooden spoon, check for bubbles and a specific sour smell.
2. Discard 100g of the starter and replace it with 50g of flour and 50g of water. Repeat that every 24 hours. Observe your starter carefully, it should begin to rise and fall in several hours after the feeding. Your starter is ready when it gets into a pattern and rises and falls predictably, at the same time.
Levain
1. Take 1 tablespoon of the starter, place in a large glass mixing bowl, add 100g of flour (you can use a 50/50 mixture of whole sprouted flour and white flour, all sprouted flour, or any ratio you prefer) and 100g of purified water (78F (25C)). Leave to ferment overnight, covered. Your oven is a good place for that.
2. Perform the floating test. Drop a small amount of levain into a bowl of water using a wet spoon. The levain should float on the surface. If it does, begin mixing your bread, if not – leave to ferment more and check again in 30 minutes. I’ve noticed that all whole grain levains don’t float as well as 50/50 levains. At times, even if the all whole grain levain floats for a few seconds and then sinks, it is enough to make bread. That is if your levain looks obviously well aerated – all bubbly and porous when moved with a spoon. It should also smell in an overripe fruity sort of way.
Mixing the Bread Dough
1. Weigh 100g of levain in a large bowl (never use metal when working with sourdough). Dissolve it in 350g 80F (26C) of purified water and add 500g of flour (sprouted, whole grain or a mix, whichever you decide to use). Mix it with your hands until no dry lumps are left. Leave it covered for 40 minutes to an hour to autolyse. Don’t skip this step.
2. Add 10g of sea salt and mix it in, squeezing the dough between your fingers.
Bulk Fermentation
1. Begin a series of turns. Every 30 minutes, grab the underside of the dough with wet hands, stretch it up and fold it back over the rest of the dough. Repeat this action 3-4 times until you complete the circle, to let the dough be evenly developed. Do this over the course of 2 hours.
2. Then leave the dough undisturbed for another 2 hours. You may need a longer bulk fermentation time if your ambient room temperature is very cold or the dough doesn’t become lighter after 4 hours.
Bench Rest
1. Turn the dough onto a liberally floured (use brown rice flour) working surface. Dust the surface with more brown rice flour and shape it gently and briefly into a round loaf. Leave for 30 minutes, covered with a bowl or a kitchen towel. The dough will spread to the degree that depends on the flour that you use.
2. Fold the third of the dough closest to you up and over the middle third of the loaf. Then fold the thirds that are right and left to you, one at a time, over the center. Finish with the farthest side from you, stretching it over the previous folds. Grab the dough nearest to you, stretching it up and over, rolling the whole piece away. This way all the seams should be on the bottom. Round your loaf against the work surface.
Final Rise
1. Prepare a basket or bowl covered with a clean cotton or linen towel and generously dusted with brown rice flour. Turn your dough into the basket, seam side up and cover with the towel.
2. Let it rise for 3-4 hours at warm room temperature (around 75 F (24 C)) or place in the refrigerator for up to 20 hours. The time of final rest will affect the taste of the bread. The longer it ferments, the more complex and acidic the taste will be.
Baking
1. Preheat your oven to 500F (260C) 30 minutes prior to baking time. Place your cast iron combo cooker or dutch oven in the oven.
2. After 30 minutes, unwrap the dough, place a piece of parchment paper over and invert the dough onto it. Score the top of the dough with a very sharp knife.
3. Quickly but carefully remove the bottom of your combo cooker or dutch oven from the oven, leaving the lid behind. Use oven mittens and be very careful. Drop the loaf into the cooker together with the parchment paper. Transfer back into the oven and close the lid tightly. Decrease the temperature to 450F (232C) immediately. Bake for 20 minutes.
4. Open the oven and remove the lid. Bake for another 20-25 minutes until a nice deep colour. Wait for 1 1/2 hours before slicing if possible.
Tags: bread, fermentation, recipe, sourdough
Tweet
March 24th, 2010
It is not a secret that we are all addicted to bread, the kind that is made with wheat flour – it has been a staple and a comfort to so many of us in many different cultures. If you do enough research on wheat, you will soon discover that even in its raw, sprouted form, it is much more of a culprit than a friend (wheatgrass is the exception). I’ve tried to cross the flour off my ingredient list numerous times before discovering raw food, and every attempt resulted in a struggle.
This onion bread is very aromatic, and pairs well with green soup, salads, raw marinara, and cheese. Also, be sure to try mini sandwiches with raw sauerkraut and a slice of tomato on top.
I took the main core of this recipe from a forum, but the idea of embedding the bread with seeds and herbs for garnish and flavour was my own.
Raw Onion Bread
1/2 lb yellow onions – sliced
1 cup raw sunflower seeds – soaked for 1 hour
1/4 cup nama shoyu
1/4 cup olive oil
1 cup flax seeds – ground in a coffee grinder
In a food processor, whirl onions, sunflower seeds, nama shoyu and olive oil until smooth. Add flax seeds and blend until thoroughly combined. Spread on Teflex sheets, sprinkle with poppy seeds, brown/golden/both flax seeds, light/black/both raw sesame seeds, sunflower seeds, and minced parsley. With wet hands press all the garnishing ingredients into the batter. Dehydrate at 105F for 6 hours. Flip, carefully peel the sheet away, and dehydrate for another couple of hours, until the batter is no longer sticky. Cut into crackers of desired size. Return the pieces onto trays and dehydrate for a total of 18-24 hours. Keep refrigerated in air-tight glass containers.
Enjoy!
Post by: A
Tags: a, bread, food, raw food, recipe, snack
Tweet

