

April 20th, 2015

Chances are, you’re familiar with mung bean noodles, some clear and some ghostly white, that can be found in abundance at Asian markets. I’ve always been fascinated with the simplicity of their ingredients list, which typically includes only mung beans and water. Making pasta at home has become somewhat of a hobby for me over this past winter, and I was determined to nail down this healthy, protein-rich mung bean version.

The first attempt, which involved just grounding mung beans into flour without sprouting them, resulted in pasta with too beany of a taste that I wasn’t satisfied with. I noticed long ago that sprouting grains and garbanzo beans improves the taste of the resulting flour, so I decided to sprout the mung beans for this pasta as well. My next attempt, made of sprouted flour, was much better and mild tasting, but included eggs, and I didn’t care for the texture.

When I was ready to give up the idea, I bumped into the possibility of using psyllium husks as a binder in gluten free pasta. I gave them a try and it turned out absolutely amazing – a nicely pliable, flavorful, freshly-made pasta, that is very light and gentle on your stomach, and quite easy to make once your flour is ready.
I haven’t tried this yet, but I’m pretty sure that other types of gluten free flours such as quinoa, buckwheat, etc. will work great in this recipe as well.

It may seem like a lot of work to make such flour at home, but in reality what you will mostly have to do is wait until beans sprout and dry. If the process is not for you, however, there are several companies that make sprouted flours and my latest favorite is Blue Mountain Organics. Our local health food store carries and array of their flours and they are not only delicious, but also less expensive than regular flour. For this post, I prepared the pasta with peas and spinach to celebrate spring, but it will work well with your favorite homemade tomato sauce or any other pasta toppings. Happy Spring!

Sprouted Mung Bean Pasta
adapted from here
Serves 6-8
1 tablespoon psyllium husk powder
1 cup sifted sprouted mung bean flour (see below), plus more for rolling out pasta
1/3 cup tapioca flour
1/4 teaspoon salt, plus more for salting water
2 tablespoons coconut oil – 1 tablespoon melted, divided
3-4 cups baby spinach leaves
2 cups fresh or frozen peas
splash of canned coconut milk – optional
freshly ground black pepper
grated Parmesan – optional
1. Mix together psyllium husk powder and 4 tablespoons filtered water in a small bowl. Let thicken while mixing together dry ingredients.
2. Combine flours and salt in a large bowl, mix to combine. Make a well in the center, add 1 tablespoon melted coconut oil, gelled psyllium husk and 4 tablespoons of water. Stir to combine with a fork as much as you can. The mixture will appear dry, but don’t add more water at this point. Begin working with your hands, mixing and kneading the mixture into slightly sticky (but not wet) dough. Add more water, one tablespoon at a time, if you find that it’s absolutely necessary, or more flour if dough seems too wet.
3. Divide the dough into 4 equal parts, keep them wrapped to prevent drying.
4. Working with one portion at a time, roll out on a well floured surface into a paper thin thickness. Cut it into pasta of any desired shape using a pizza cutter or a sharp knife. Sprinkle with more flour to prevent from sticking (the same sprouted mung bean flour or brown rice flour will work great for rolling and dusting).
5. Divide the pasta into two equal portions. Bring a large pot of well-salted water to a boil and cook one portion of fresh pasta at a time for 2 minutes, until al-dente.
6. Meanwhile, heat the remaining coconut oil in a large pan over medium heat. Add half of the spinach, sprinkle with salt and stir to coat. Drain pasta reserving about 1/4 cup of cooking liquid. Add pasta, 2 tablespoons of reserved liquid and splash of coconut milk (if using) to the pan with spinach, stir until spinach is wilted, for a minute or so. Add half of the peas, sprinkle with freshly ground black pepper, stir them in and remove from heat.
7. Serve immediately with freshly grated Parmesan if desired.
Note: You can continue cooking the other portions of pasta in the same manner or keep the remaining dough wrapped in plastic and refrigerated for up to 2 days. Remove from refridgerator to warm up 15 minutes prior to rolling.
Sprouted Mung Bean Flour
1. Rinse 2 cups of mung beans and place them in a large bowl covered with filtered water, soak overnight.
2. Drain and rinse again, cover with wet kitchen towel and leave to sprout. You should see white tails in 24-48 hours. Make sure to rinse every 8 hours and keep the towel damp. For the purpose of this flour, sprouts don’t need to be large and thick – tiny white tails will be sufficient.
3. When you are satisfied with the look of your sprouts, rinse them thoroughly, drain well and shake off water excess as much as possible. If you have a dehydrator, spread sprouted beans on mesh screen covered trays and dehydrate at 115 F until completely dry.
4. Alternatively, spread on a dry kitchen towel or paper towels and let dry for 24 hours, change towels to dry ones after the first 8 hours. Spread on a baking sheet and continue to dry in the oven at the lowest temperature for a couple of hours, until completely dry.
5. Grind into flour using a high speed blender, mill or coffee grinder (in batches). Sift through a fine mesh strainer.
Tags: gluten free, mung beans, pasta, peas, spinach
 Tweet
Tweet
May 13th, 2014
If you think about it, pretty much every culture has some kind of dumplings in its food repertoire. Russians are not an exception and our pelmeni and vareniki are some of the most characteristic dishes of Russian cuisine. Russian dumplings are not just any food, as they often involve a family ritual.

Historically, kitchen duties in Russian households have been women’s almost exclusively. Our culture has been such where a woman cooks, raises children, keeps the house, while often working just as many hours as the man. Thankfully, all that has been changing. In many traditional families, however, when it was time to make dumplings, men would make and exception and participate in the crafting of them. Every family member was usually delegated a specific job – making the filling and the dough, cutting the dough and preparing it for rolling, rolling itself, distributing of the filling and, finally, shaping the dumplings. This way, the entire family could make a couple of hundreds of dumplings in just couple a of hours, freeze them and have them handy for several weeks to come.


In cold winters, back when refrigeration wasn’t an option, dumplings were stored in pillow cases hanging out of windows. They are also a very economical dish, as you can feed a lot of people using less ingredients as a stuffing – meat, potatoes, farmers cheese, etc. Originally, that was one of the reasons for dumplings becoming so popular, when food was in deficit.


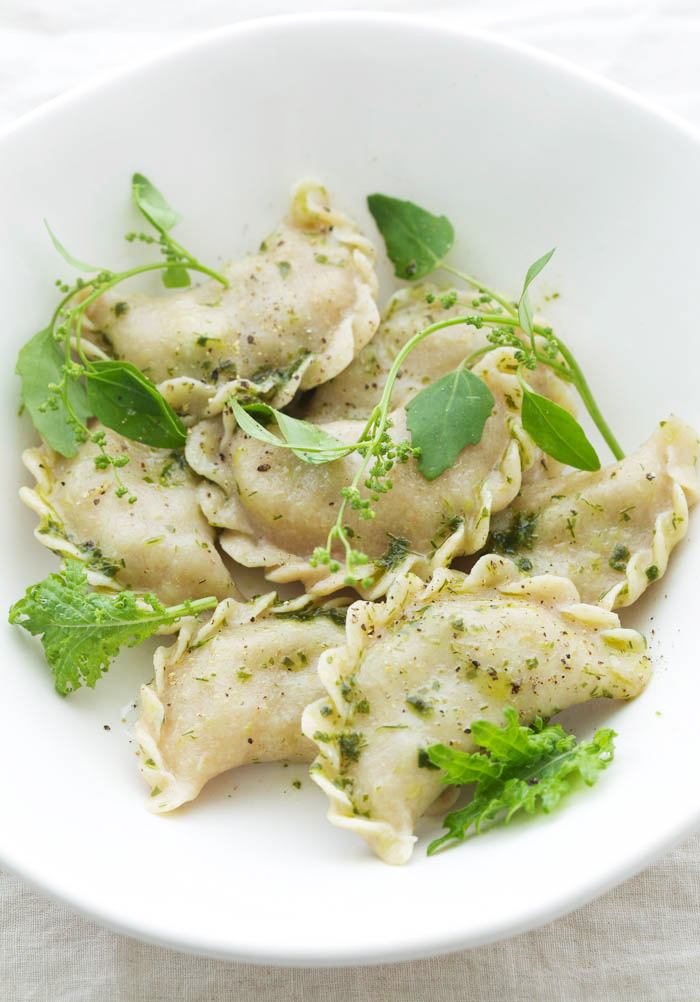
The only traditionally Russian thing left in the vareniki that I share with you today is the way I crafted them with the pinches around the edges. I made the dough vegan and with spelt flour instead of wheat. And the filling is very green and light to celebrate spring.
We are in Russia and having a great time catching up with friends and family. Enjoy and until next time.

Spring Vareniki
makes about 60-65 dumplings
for the dough
1 cup whole spelt flour or sprouted spelt flour
2 cups light spelt flour
1 teaspoon sea salt
3 tablespoons coconut or olive oil
1 1/4 cups boiling water
for the filling
1 tablespoon olive oil
1-2 shallots or 1 small yellow onion – diced
1-inch piece fresh ginger root – peeled and minced
1-2 garlic clove – minced
about 10 asparagus spears – diced
2 handfuls snow peas
1 cup green peas – fresh or frozen and thawed
sea salt to taste
1/2 lemon – juice
handful of fresh basil – torn, optional
to make the dough
1. Combine flours with the salt in a large mixing bowl. Add oil and work it in with your hands.
2. Slowly pour boiling water in, stirring. Knead into a soft dough, cover and let rest while making the filling.
to make the filling
1. Warm the oil in a large pan over medium heat. Add shallots, ginger and garlic, sauté for 4 minutes.
2. Add in asparagus, snow peas and green peas, sauté until vegetables are bright green, for about 4-5 minutes. Add salt and lemon juice, remove from heat. Let cool.
to make the vareniki
1. Flour your working surface with the light spelt flour. Cut one medium-sized piece from the dough at a time and roll between your hands into a rope of an even thickness.
2. Cut the rope into small pieces. Roll each piece in the flour and press into a round disk with the palm of your hand.
3. Roll each disc into a 1/8-inch thick dumpling skin. Add the basil into the filling if using.
4. Fill each skin with a small amount of filling. Pinch both edges together to enclose the filling (make sure that they sticks together securely – that’s why we use the pinched-out seal pictured in photos). Lay the finished dumplings on a parchment paper covered tray.
5. Repeat with the rest of the dough and filling. Cook the vareniki immediately or freeze. Transfer into large ziplock bags once hard and keep frozen until ready to use, within one month.
6. To cook the vareniki, bring a large pot of salted water to a boil. Add in the vareniki and gently stir to make sure that they’re not sticking to the bottom of the pot. Boil for 3-4 minutes. Remove with a slotted spoon. Add ghee or any mild tasting oil. Serve with your favorite pesto, chimichurri or the traditional Russian way – with sour cream (good plain yogurt will work as well).
Note: Alternatively, you can divide all the dough into two portions and roll one portion at a time to be 1/8 inch thick. Then cut out uniform skins using a glass or cookie cutter. Re-shape, re-roll and re-cut the scraps until all the dough is used up. Keep the skins covered.
Tags: asparagus, basil, mains, peas, spelt
Tweet
July 9th, 2013
It is hot, so hot. The air is still and humid, and we are the sun’s own toast. Tiny green dots of fireflies are lighting up the nights. In other words, summer.
All I want to be eating right now is mainly gazpacho, freezing cold smoothies, and, of course, salads. Refreshing and vibrant ones with minimal, light dressing and any of the vitamin-rich produce of the summer bounty. To me, salads are a spontaneous type of dish, usually inspired by whatever fresh produce I bring home from the market.
This particular salad was made with produce from the Union Square greenmarket during my recent trip to NYC. In case you haven’t been, it is the market of all markets, where everything is possible and where you can find all the fruit and vegetables you’ve ever dreamt of. Nettles? Pea shoot flowers? Fava? Chive blossoms? Stone fruit, berries, tomatoes, all colours of eggplants and zucchini, all varieties of greens – it’s all there. In this salad, I combined raw and lightly blanched crunchy vegetables with a creamy miso-mustard dressing to make a bright summer meal. Enjoy and stay cool.
In other news, an interview with me on The Raw Book, a beautiful website full of inspiring interviews.
Summer Market Salad
Note: Feel free to substitute according to what’s available to you at the moment. Sugar snaps, snow peas, corn kernels, young green beans, and shelled edamame are some other great summer alternatives.
for the dressing
3 tablespoons miso paste – I use unpasteurized chickpea miso
1 tablespoon honey
2 teaspoons Dijon mustard
2 tablespoons lemon juice
1 tablespoon apple cider vinegar
2 tablespoons olive oil
for the salad
1 bunch asparagus
1 cup shelled fava beans or peas or mixture of both
handful of fiddleheads – optional
2-3 carrorts – shaved with a vegetable peeler
4 radishes – sliced
2 green onions – sliced
handful of pea shoots
2 cups of baby greens
handful of microgreens
to make the dressing
1. Mix the miso paste, honey and mustard to combine thoroughly.
2. Add in the rest of the ingredients, combine and set aside.
to make the salad
1. Remove the tough ends from asparagus. Blanch it, along with the fava beans and/or peas in a large amount of well salted water for 2 minutes. Using a slotted spoon, transfer to an ice water bath to stop the cooking.
2. In the same water, blanch the fiddle heads for 5 minutes and add them into the ice water as well.
3. Once the vegetables are cool, drain them over a colander and pat dry with a paper or dish towel. Gently squeeze each fava bean between your fingers to pop the bean out of its outer skin.
4. Arrange the asparagus on a salad platter and lightly drizzle with the dressing. In a bowl, combine the rest of the ingredients, with the exception of microgreens, and pour the dressing over them. Gently toss to coat. Pile the mixture over the asparagus and garnish with microgreens.
Tags: asparagus, carrots, fava, fiddlehead, greens, miso, peas, radish, recipe, salad, summer
Tweet

